
Refill cost against selling price
In Tavern Town, your nightly profit depends on keeping barrel refill costs lower than what guests pay for drinks. The bar panel displays three drink cards: Water, Sarsaparilla, and Lemonade. Each card tracks current barrel stock out of a maximum capacity of 150 units (n/150), alongside buttons to top up stock (+10 10g or Fill <n>g) and a stated selling price (Sells <n>g).
The difference between these drinks is how much gold you invest before pouring:
- Water costs zero gold to replenish. Its card states
Free, never runs dry. Every coin a guest pays for Water is pure margin. - Sarsaparilla requires paid refills. You can buy small increments using
+10 10g, or refill the rest of the 150-unit barrel usingFill. In one recorded setup, topping off 1 unit cost 1g (Fill 1g). - Lemonade also requires paid refills, with a higher purchase threshold and selling price. In a later gameplay record, refilling a depleted barrel showed a cost of
Fill 143g.
Because each barrel holds up to 150 units, refilling large batches can quickly drain your coin reserve if you run low on cash.
Before adjusting your service, look at how the bar interface presents drink information:
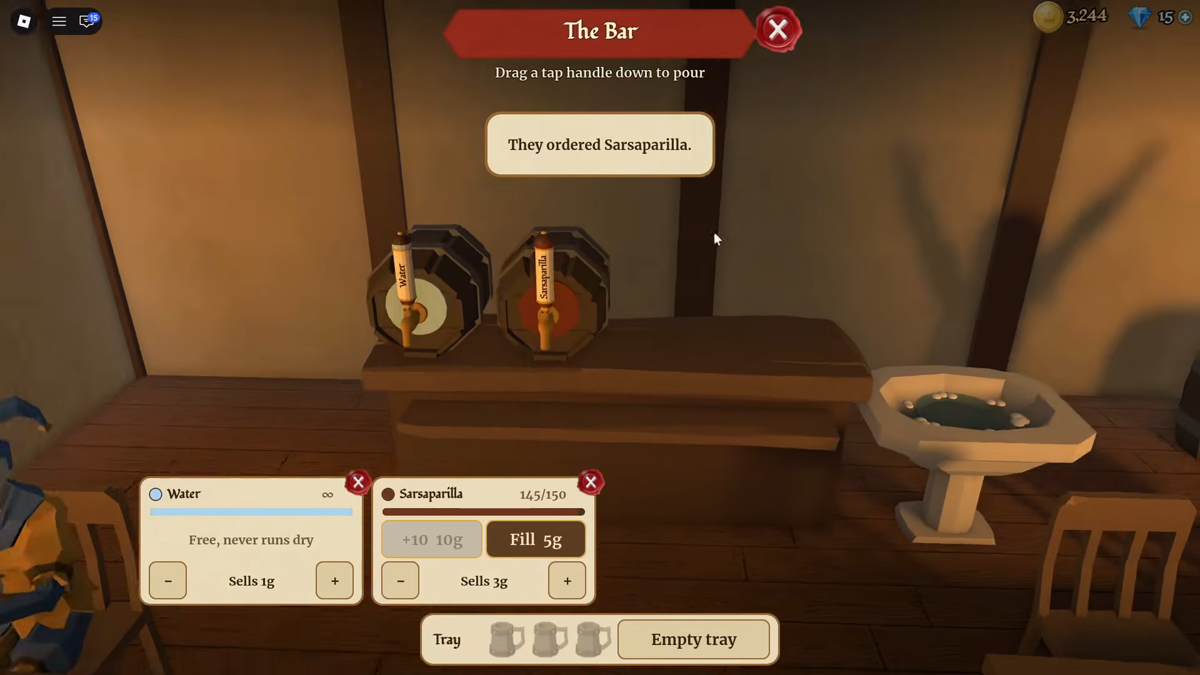
The screenshot above shows an early-game bar with two taps available: Water (Sells 1g) and Sarsaparilla (145/150, Sells 3g, Fill 5g, +10 10g). It also shows the guest order prompt (They ordered Sarsaparilla.) and the default tray holding a mug. Notice that Water has no refill fee, while Sarsaparilla requires ongoing gold to stay stocked.
The following table compares the three drinks based on verified in-game panel readings:
| Drink | Refill cost | Recorded selling price | What it means when serving |
|---|---|---|---|
| Water | Free (never runs dry) | 1g or 2g | Zero overhead cost. Safe default when low on gold, though profit per guest is minimal. |
| Sarsaparilla | Paid (+10 10g, or Fill <n>g) |
3g or 5g | Requires active barrel maintenance. Profitable as long as guests pay and you maintain stock. |
| Lemonade | Paid (Fill <n>g) |
7g or 10g | Highest gross payout per order, but requires substantial gold reserves to refill depleted barrels. |
Two specific data gaps remain unverified from the captured gameplay. First, how the +10 10g button converts into individual served mugs was not recorded on screen—it is unconfirmed whether 10 stock units equal exactly 10 customer drinks. Second, the exact trigger or unlock requirement for when Lemonade becomes available as a third tap was not recorded in the footage.
Read your own bar panel
Do not assume your drinks will sell for the exact numbers you see in other players' playthroughs. In video evidence across three separate creators, the recorded selling prices differ significantly:
- AccelToWin (at 05:59): Water sold for 1g, Sarsaparilla (at 149/150 stock) sold for 3g with
Fill 1g. - Chiru. (at 32:17): Water sold for 2g (displayed as
+1), Sarsaparilla sold for 5g (displayed as+2), and Lemonade sold for 10g (displayed as+3), withFill 143g. - Asteryxo (at 14:48): Water sold for 1g, Sarsaparilla (at 150/150 stock) sold for 3g, and Lemonade (at 150/150 stock) sold for 7g.
These three readings come from three entirely different creators and accounts. They do not represent a single account growth curve or a guaranteed upgrade progression. Selling prices differ between the recorded setups, so you must always read the numbers on your own screen first.
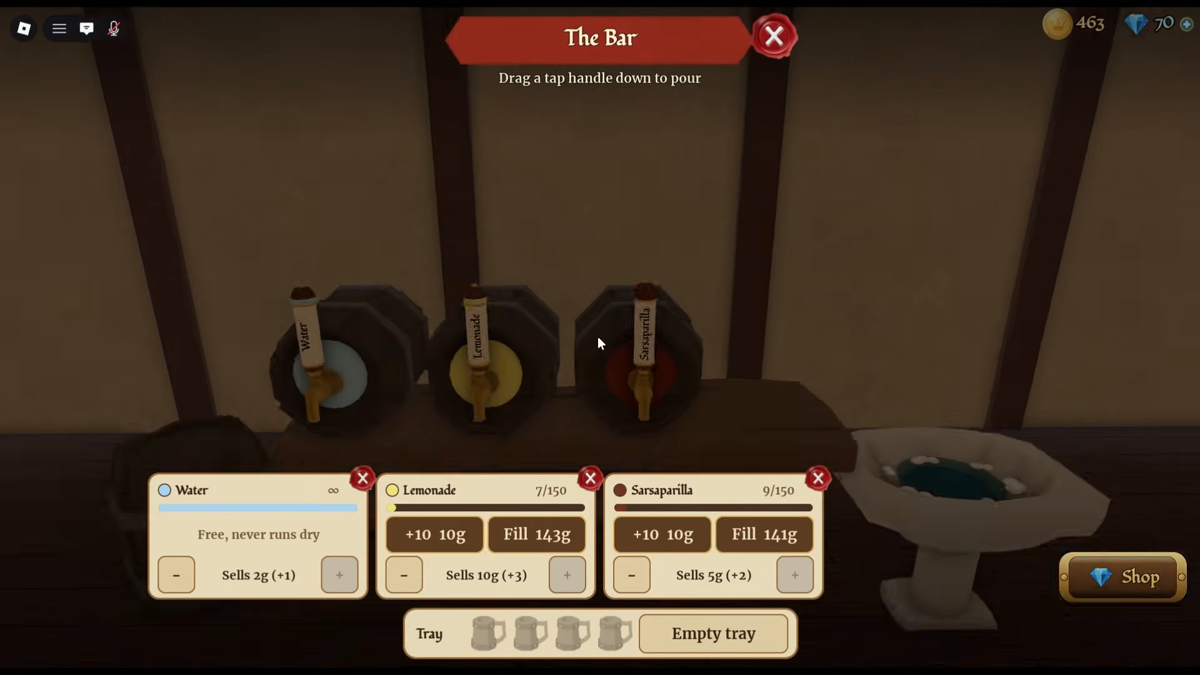
The image above shows Chiru.'s bar panel with all three barrels active: Water at Sells 2g (+1), Sarsaparilla at Sells 5g (+2), and Lemonade at Sells 10g (+3). The parenthetical bonuses indicate that selling prices increase above base rates, but the exact formula connecting character progression to drink bonuses was not captured.
Because selling prices vary across setups, read the Sells <n>g tag on your own screen before deciding whether to push expensive barrels. If your Sarsaparilla sells for 3g, your margin over refills is tight. If your setup has pushed it to 5g, you have much more breathing room when paying nightly barrel bills.
Trays, mugs and washing
Pouring drinks is only the first half of serving. Once you pour at the tap using Drag a tap handle down to pour, your tray capacity dictates how many items you can carry.
Your character starts with a basic tray capacity of 3 slots. When you unlock the Steady Tray node on the skill tree, your tray capacity increases by 1, bringing your total to 4 carrying slots. The in-game description for this node states: Your tray holds 1 more (you start with 3).
Managing your tray space requires balancing outgoing drinks against incoming dirty mugs:
- Carrying orders out: When you pick up drinks, the HUD displays your tray load, such as
Carrying 1/4: Sarsaparilla. Walk to the guest table and pressE — Guest / Serve Sarsaparillato deliver it. - Handling dirty mugs: After guests finish drinking, they leave dirty mugs on the table. Approach the table and press
F — Mugs / Clear tableto collect them onto your tray. - Tray congestion: Dirty mugs occupy the exact same tray slots as fresh drinks. The HUD will show status lines like
Carrying 3/4: 3x dirty mugorCarrying 4/4: 4x dirty mug. - Hands full warning: If your tray fills completely with dirty tableware, you cannot pour or carry any new drinks. The game displays the warning:
Your hands are full. Take the mugs to the wash basin first. x5. - Resetting your tray: Carry the dirty mugs to the wash basin furniture item in your tavern to clean them. If you need to clear your hands immediately during a rush, you can also use
Empty tray.