
Three branches and the mastery ring
When you open the Skill Tree menu, the top header bar shows your tavern rank, available skill points, and a milestone reading Level 2 · 0 skill points · Masteries at level 50. The canvas organizes upgrades into three primary branch tabs, while the outer edge holds late-game progression.
Before allocating points, look at the layout shown in the recorded gameplay screen below. It displays the branch headers, the node cluster, and the gem reset button in the upper right corner:
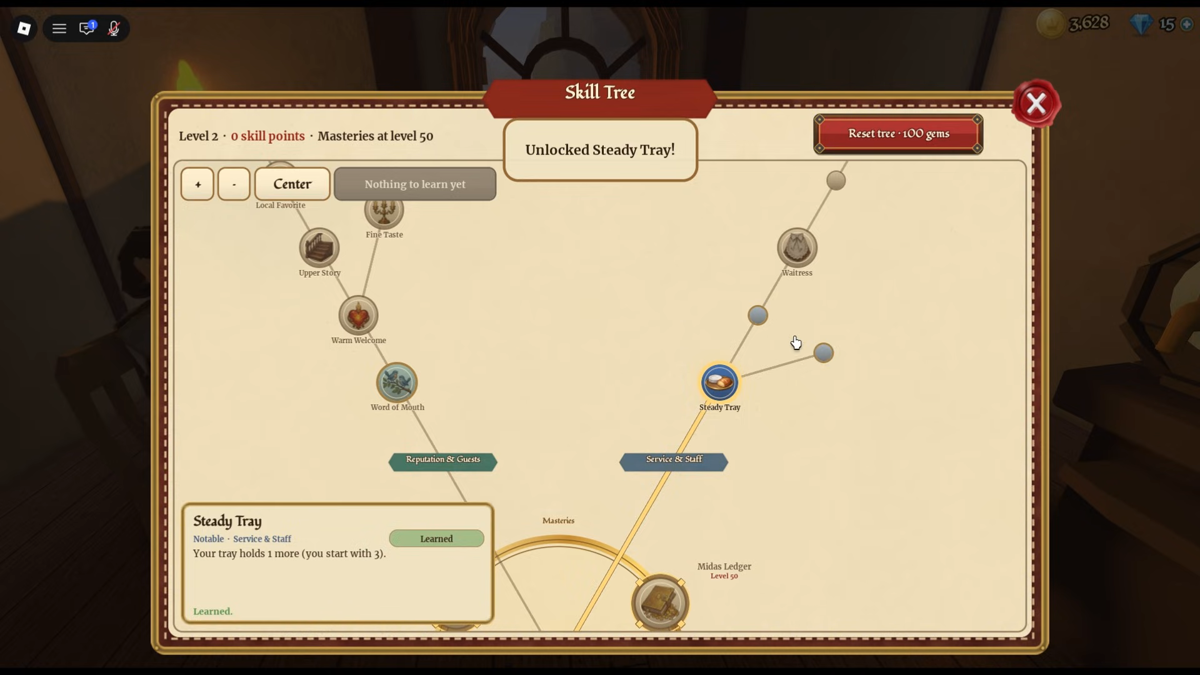
The three primary branches organize different operational areas:
| Branch label | Functional domain | Recorded nodes visible | What was verified |
|---|---|---|---|
Center |
Core building and layout foundations | Upper Story |
Node position confirmed on screen; upgrade prerequisites and unlocks were not recorded |
Reputation & Guests |
Customer flow and guest satisfaction | Local Favorite, Fine Taste, Warm Welcome, Word of Mouth |
Node names confirmed on screen; individual traffic multipliers were not recorded |
Service & Staff |
Serving capacity, tray handling, and floor staffing | Steady Tray, Waitress |
Steady Tray effect fully verified; Waitress node mechanics were not recorded |
To the right of the three main branches sits an outer section marked Masters or Masteries. A locked milestone node named Midas Ledger Level 50 anchors this tier. The UI indicates that masteries unlock only once your tavern hits level 50. Specific stat bonuses, point costs, or perks tied to the Midas Ledger and other mastery nodes were not recorded in available footage.
The nodes that were read
While several node titles appear on the skill tree grid, the game interface only displayed the complete tooltip description for one upgrade during gameplay captures. The table below lists all seven confirmed node names, their branch placement, and their recorded status:
| Node name | Branch location | Displayed effect on screen | Status in recorded evidence |
|---|---|---|---|
Steady Tray |
Service & Staff | "Your tray holds 1 more (you start with 3)." | Verified. Unlocking displays the notification: Unlocked Steady Tray!. |
Local Favorite |
Reputation & Guests | effect not recorded | Node name and icon visible; effect description was not opened on screen. |
Fine Taste |
Reputation & Guests | effect not recorded | Node name and icon visible; effect description was not opened on screen. |
Upper Story |
Center | effect not recorded | Node name and icon visible; effect description was not opened on screen. |
Warm Welcome |
Reputation & Guests | effect not recorded | Node name and icon visible; effect description was not opened on screen. |
Word of Mouth |
Reputation & Guests | effect not recorded | Node name and icon visible; effect description was not opened on screen. |
Waitress |
Service & Staff | effect not recorded | Node name and icon visible; effect description was not opened on screen. |
Because descriptions for the other six nodes were not opened on camera, their exact stat bonuses, multipliers, or gold costs cannot be inferred from their titles. Whether Upper Story unlocks second-floor staircase construction or reduces building costs was not recorded. Similarly, whether the Waitress node grants a free worker, unlocks a hiring slot, or lowers waitress wage costs remains unverified.
The single confirmed mechanical upgrade is Steady Tray. Under default settings, your character starts with a 3-slot carrying tray. Unlocking Steady Tray increases tray capacity to 4 mugs. This allows you to deliver larger orders or clear four-seat tables in one trip to the wash basin.
Points, reset and what to spend on
Your available skill points appear at the top left of the menu alongside your level indicator (Level 2 · 0 skill points). You earn skill points as your tavern levels up from earning XP, which accumulates from serving drinks, cooking food, and finishing service cycles. However, the exact rate of skill point gain per level, the leveling XP curve, and the individual skill point cost per node were not recorded.
In the top right corner of the menu, an orange button reads Reset tree · 100 gems. Clicking this option refunds your invested skill points back into your available pool. Keep in mind that 100 gems represents a notable expense during early play, where gems come primarily in small batches from mining asteroid crystals and completing quest milestones.
Because complete node stat descriptions are missing for most of the tree, avoid following rigid point-by-point tier lists that assume undocumented bonuses. Instead, choose your branch focus based on the operational bottleneck you encounter during service:
- If your serving tray fills up too quickly: Put your early priority into
Service & Staffto secureSteady Tray. Starting with 3 slots means clearing a four-chair table requires two trips to the wash basin. Gaining that fourth carrying slot speeds up floor turnaround and keeps dirty mugs from blocking incoming customers. - If your tavern seats remain empty: Focus on
Reputation & Guests. Nodes likeWarm Welcome,Word of Mouth, andLocal Favoritesit on the guest acquisition side of the tree. When your guest arrival rate (Guests/minon the HUD) lags behind your total chair capacity, investing in guest-facing branches targets customer volume. - If you need more physical room for tables: Look into the
Centerbranch towardUpper Story. Expanding outward on the ground floor eventually runs into boundary walls and furniture limits, making vertical space necessary once you can afford structural costs. - If you plan to reset your build: Ensure you have 100 gems saved before testing experimental branch setups. If you spend your gems on shop crates or cosmetic items, you must wait for gem asteroid drops or quest milestones before you can reallocate points.
Once you allocate a point, verify your updated tray capacity or guest arrival counter during the next business day before spending additional gold on furniture.